


LanIP stores static IP addresses in a MySQL database. LanIP is not:
- an inventory manager, because of limited attributes associated to each IP address
- a network manager: no automatic discovery, no SNMP manager, no telnet or RDP, ...
But it is:
- a handy way of manually maintaining assigned IP addresses
- a few associated tools: ping, nslookup, wake-on-lan
Screenshot
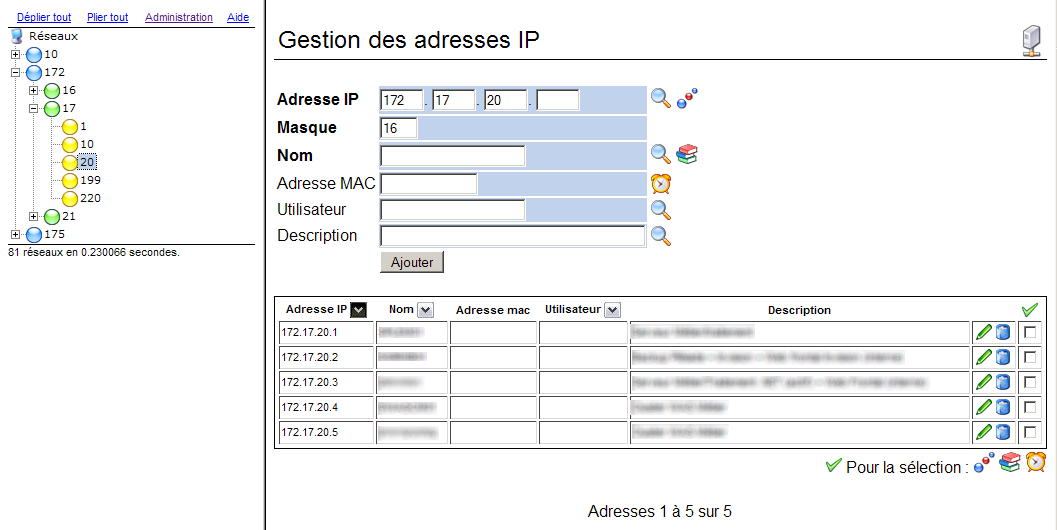
Note: names have been blured to protect the innocents.
Gimme gimme gimme
- A Windows operating system
- A web server, preferably Apache
- A perl interpreter, preferably Active Perl
- A MySQL database server
Compatibility
Windows 2003 and Windows 2000.
LanIP is distributed under Gnu General Public License, version 2.
IPAddress12.zip (roughly 124 Ko) holds all necessary files.
There is no automatic setup, so please read carefully installation instructions or update instructions.
Changelog
Multiple deletion. Stores record modification date and user (if logging as activated). Database versionning. Plugins.Version 1.1
- Multiple address selection, with associated actions. Consistency check.
Version 1.0
- First public release.
From version 1.x to 1.2
- Delete content of directory c:\program files\ipaddress1, except for configuration file config.inc.
- Extract archive content in same directory. Do not overwrite config.inc.
- Run SQL database update script, from installation root directory:
mysql -u root -p
<mySQL password>
mySQL> source update_11_12.sql;
mySQL> exit;
From version 1.0 to 1.1
- Delete content of directory c:\program files\ipaddress1, except for configuration file config.inc.
- Extract archive content in same directory. Do not overwrite config.inc.
Let's call your web server SERVEUR_CENTRAL.
Installing prerequisites
On SERVEUR_CENTRAL:
- Grab prerequisite applications
- Install Apache (or IIS, at your own risks)
- Install MySQL (package "essential", installation "typical") and configure it (write down root password)
- Install Active Perl (full installation)
- Using PPM, add Perl package DBD::mysql
[set http_proxy=http//votre.proxy.interne:8080]
If you run into a problem, check these comments.
ppm install DBD::mysql
Other necessary Perl packages are:- DBI
- CGI
- Net::Ping
- Socket
- Time::HiRes
- Locale::Maketext
Installing LanIP
Unzip LanIP archive on SERVEUR_CENTRAL, in directory C:\Program Files\. Subdirectory "IPAddress1" should be created (and not "LanIP" or "LanIP1", just to confuse you).
Change if necessary each *.pl script's first line path to Perl interpreter. If you did a standard install of Active Perl, you can leave #!c:\perl\bin\perl.
Make sure Apache will accept to run Perl scripts in LanIP directory. Add in Apache configuration file httpd.conf the following lines:
Alias /lanip/ "C:/Program Files/IPAddress1/html/"
<Directory "C:/Program Files/IPAddress1/html/">
    AddHandler cgi-script .pl
    Options Indexes FollowSymLinks -MultiViews +ExecCGI
    AllowOverride all
    Order allow,deny
    Allow from all
</Directory>
You have to restart Apache after that.
Browse to URL http://localhost/lanip/. Left frame is empty, right frame proposes to enter an IP address. Clic on the link to management page, in upper left frame.
Fill all items in first chapter. Default values should be OK, except for MySQL database user's password you may want to change, and subnet mask your LAN uses. Save.
Note: the user running Apache must have write permissions on directory C:\Program Files\IPAddress1\html, where configuration file is saved.
Create database: in second chapter fill MySQL root password and click on "Create". Once it is done, go back to home page.
This time, left frame shows an empty tree.
Using LanIP
Click on the icon at the root of the tree (i.e. "Networks") to go back home at any time. While you add new addresses, they will show up in the tree, one tree node for each 3 first bytes of IP address, on tree leaf for the last byte. Click on a byte to see all computers sharing the same IP address root.
Adding
Fields in bold are mandatory, they are: IP address (database key, must be unique), subnet mask (used by Wake-On-Lan), and machine name.
Searching
You can search on part of the machine name, user name or comments, using SQL wildcard "%", which is the same as the usual "*". For example, %INF% in Name field will return all machines whose name contains "INF".
You can also search on any byte of the IP address: just leave blank other bytes.
To run the search, click on corresponding field's search button  . "Enter" key is disabled (distressing, hu?).
Editing
To change an existing computer's IP address, you have to:
- delete it first
- then add it with its new address
Other fields may be edited freely, search for the record and click on  . Edit the fields you need and click "Add". You will then have to confirm update.
Deleting
Find the record and click  . You will have to confirm your choice.
Tools
If your LAN is segmented (i.e. routed), your SERVEUR_CENTRAL has to know each possible route for the tools to work.
"Ping" button  does... her... a ping.
"Nslookup" button  runs a DNS query, using the DNS servers defined for SERVEUR_CENTRAL.
Inconsistencies between database and real life are highlighted.
You can also remotely start a computer, with "Wake On LAN" button  . It requires a network card that supports wake-on-lan, and the function to be activated in the BIOS.
Import / Export
Import and export are available in management page.You can export a CSV file, in "native" format, with the following columns:
@IP;Nom;@Mac;Utilisateur;DescriptionThe file starts with a title line, which must not be changed (it's the file's signature), and then one line per record.
You can import from different formats:
- Native CSV: same as export format.
- Pytheas CSV: Pytheas Asset Management©™® export format. One title line, and then one line per record:
Désignation;Etat;Adresse IP;Domaine;DHCP;Passerelle;Sous-réseau;Serv DNS 1;Serv DNS 2;Nom d'ordinateur;Adr Wins 1;Adr Wins 2;Type réseau;Libre;Site;Bâtiment;Etage;Salle;Société;Département;Service;Utilisateur
Only the following fields are extracted: "Adresse IP", "Nom", "Département - Service" in LanIP "comments" field, and "Utilisateur". - Mac address CSV: one title line, then one line per record:
Nom;@IP;@Mac
Restricting access to management page
To restrict access to management page — or any other page you want — via a login/password, use Apache's ".htaccess". Create a file named .htaccess in LanIP's "html" subdirectory. Windows Explorer won't let you name a file with only an extension, so use the command line:
c:
cd "\program files\IPAddress1"
echo.>.htaccess
Edit .htaccess, so it contains:
<FilesMatch admin.pl>
AuthName "LanIP"
AuthType Basic
AuthUserFile "c:/program files/IPAddress1/.htpasswd"
require valid-user
</FilesMatch>
Now create the file containing login and password that is authorized for management page:
cd ..
c:\program files\Apache Software Foundation\Apache2.2\bin\htpasswd -c .htpasswd <login>
<password>
Writing plugins
A plugin is made of 2 files at least, stored in "plugins" directory:
- <plugin>.xml
- <plugin>.<html|pl|cgi|php|...>
<?xml version="1.0" encoding="ISO-8859-1"?>
<?xml-stylesheet type="text/xsl" href="/joomla/plugins.xsl"?>
<ipaddress>
	<plugin>
	<name>Plugin name</name>
	<version>1.0</version>
	<date>01/01/2008</date>
	<author>Your name</author>
	<notes>Function of the plugin.</notes>
	<url>Plugin URL, e.g. plugin.html</url>
	</plugin>
</ipaddress>
The second file is the plugin code, written in any language your Web server understands. Perl is a comfortable choice.
IPAddress scan "plugins" directory looking for XML files, and displays them on home page.
Let's have a closer look at default plugin, "Last Change". Plugin URL is a HTML page with parameter input (lastchange.html). It call a Perl script performing the search (lastchange.pl).
That script is made easier to code using Perl function IPAddress::displayResult($query, $page, $action, %params). That function displays — using paging — the results corresponding to the parameters it was given, namely:
- $query : SQL query to be executed
- $page : page number to display
- $action : script to call upon page change
- %params : hash variable containing HTTP parameters the script will relay, as "hidden" fields, to $action script
Query
Refer to database schema to create your query.
Page
The search script (e.g. lastchange.pl) is self-calling. That is to say it calls itself upon page change, only one parameter being changed... good guess, it's page number. It is a hidden POST parameter. If it is not given, it is set by default to zero.
Action
Just like page number, action (i.e. URL) to call upon page change is a hidden parameter. It is retreived through Perl CGI object: my $action = $cgi_query->url(-relative=>1);.
Params
Hash %params holds parameters initially givent to the script by the HTML page, along with their values. They are relayed to $action script as hidden fields.
To do
- Make SQL requests safe. "SQL injection" can be easily done through search fields.
- Autodiscovery.
- Translate LanIP in your own language, using example IPAddress1/I18N/en.pm.
Thanks
- To Geir Landrö, for "dTree"
- To Vitaly Evseenko from Matcode Software for Wake-On-Lan tool "mc-wol.exe".
")
")

